| 
THE CAVEAT
A preface
DNA FINGERPRINTING OR (ALTOGETHER NOW) THE POLYMERASE CHAIN REACTION!
A quick introduction
THE GIST AND HOW IT MORE OR LESS WORKS
A primer on the polymerase chain reaction
YOUR TURN... LOOKING FOR AN ALU INSERTION.[1]
Conceptual synopsis of a DNA fingerprint experiment for you to try.
THE EXPERIMENTAL DETAILS
Run down of things needed before starting the experiment.
O.K. READY TO START THE PROCEDURE
Experimental protocol. Setting up the reaction.
LINK TO TEMPLATE CODE
An example of code required for themal cycling.
RESULTS
Some data obtained
SOME TIPS FOR TROUBLESHOOTING
A guide to problems that can arise.
FOOTNOTES
ETHICS: GENETIC TESTS AND TOYS
So what exactly can you do with this: an ethical perspective
| | | | SCQ | MAKE | AMBL | PHYS253 | UBiC | CAE
THE D.I.Y. P.C.R. APPENDIX
By Jon Nakane, Keddie Brown, Peter Danielson, Joanne Fox, Yas Shirazu, Donna Lee, Esther Abd-Elmessih and David Ng
(This section is provided as a supplement to the Home Molecular Genetics piece in Issue 7 of MAKE magazine).
"Home Molecular Genetics" has a few errors. The diagram on p. 66 should show the batteries connected in series and the two electrode wires running horizontally along each end of the chamber; see the corrected diagram at right. On p. 67, "Prepare the DNA," the amount of running buffer should read "75 µl (3 droplets)." In "Stain the Gel," the dilution ratio for 2.3% Methylene Blue should be 115:1. In the diagram on p. 69, mineral oil only surrounds the reaction tube; the PCR reaction mix inside the tube is a water-based solution..
DNA FINGERPRINTING OR (ALTOGETHER NOW) THE POLYMERASE CHAIN REACTION!
The polymerase chain reaction, or PCR, is a powerful genetic technique that allows researchers to amplify DNA sequences of interest. This amplification allows better and easier genetic characterization and can be used for a variety of tasks including those in the context of genetic disease diagnosis, maternity/paternity tests, DNA forensics, or simply in the production of large amounts of DNA fragments for further study.
In nature, cells make more DNA by undergoing a process known as replication. This is where the amount of DNA is essentially doubled so that a cell dividing into two new cells can give each of these two cells a complete copy of the DNA. However, replication is a relatively complex process, requiring the regulated actions of over half a dozen different enzymes - technically challenging to pull off in the laboratory. PCR is therefore an experiment that simplifies the process of replication for greater efficiency in test tube settings.

THE GIST AND HOW IT MORE OR LESS WORKS:
So how does PCR work? And how, exactly do you simplify something like replication?
Essentially, this entails the collection of a few components needed for a successful DNA amplification reaction. Although, we’ll later highlight some specific places to get them, for now, let’s quickly summarize what they are. They include:
1. A sample of DNA to start with: there are many ways to get this, but you can use the cheek cell procedure outlined in the print article.
2. Two primers: These are short pieces of DNA that have been specifically designed to complement the region of your DNA that you wish to make more of. They can be ordered from places that do something called oligonucleotide synthesis (fancy talk for making small pieces of DNA synthetically).
3. A solution containing the 4 different nucleotides (the A’s,T’s, C’s, and G’s): necessary for use as the building blocks for DNA replication.
4. A heat stable DNA polymerase: This is an enzyme that is actually responsible for making a complementary DNA copy (i.e. replicating). The cheapest ones are usually those derived from the Thermophilus Aquaticus bacteria, and are called Taq polymerases. These polymerases will often come with a buffer solution which is a specific recipe that allows the polymerase to function at its best.
5. Equipment setup to allow a PCR reaction to cycle through three different temperatures for certain lengths of time, over and over again. This can take the form of the MAKE thermal cycler, or in a bind can be as low tech as a person moving a test tube from three different pots of water set at three different temperatures for about 3 to 4 hours!
(A good animation of PCR)
To start the PCR reaction, you’ll need to mix in a plastic tube, your DNA sample, the primers, the nucleotides, and the heat stable DNA polymerase.

First up, is a high temperature step usually at about 95C for about 1 minute, and often called the denaturation step. This is all about allowing your DNA to open up, since it naturally exists as a tight helical coil. The high temperature step will effectively melt the double stranded DNA strands into single strands. This step whilst elegant in its simplicity is the reason for the need of heat stable DNA polymerases, since the enzyme needs to be able to withstand the heat.
With the DNA open, we move to the second temperature step, referred to as the annealing step. Here, the primers, which have been designed to interact with the desired region of amplification, can now “get in.” This binding is mediated by choosing a second temperature which ensures a specific interaction, usually around 60C or so, and usually for about a minute.
With the primers bound, we can now move on to the third and final temperature step – the elongation step. By switching to a temperature where our enzyme works best, the heat stable DNA polymerase can extend the production of DNA from the two primers. This is the actual “replication” part, and consequently also involves uptake of the nucleotides. Note that at the end of this step you have two copies of the original piece of DNA of interest.
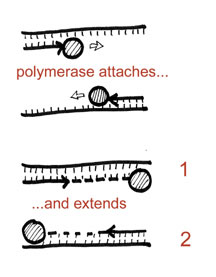
And there you have it! You’ve essentially made more of your DNA of interest (doubled it actually). However, what is cool is that you can now repeat the process over and over in the same experiment. In other words, take the two copies you’ve produced and subject them to the same three temperature steps. You’ll hopefully see that this allow your reaction to go from two copies to four. In essense, going through these three temperatures (which is called a single cycle) will result in the doubling of your DNA of interest. The thermal cycler simply allows you to do this automatically and in a programmable fashion. Most PCR experiments are done with a total of 30 or more cycles (or 30 rounds of doubling), so that you can effectively increase your DNA interest by billion times or more. Factor in the fact that a single cycle is often less than 5 minutes, and what you have is an incredibly powerful, yet simple, procedure to amplify out your DNA in a relatively short period of time.

YOUR TURN... LOOKING FOR AN ALU INSERTION.[1]
This suggested experiment will allow an individual to look within their own genome for a genetic element called an Alu insertion. Basically, the Alu insertion is a small 300 base pair DNA sequence that is often classified as junk DNA. A person will actually have approximately 500,000 copies of them scattered throughout their own DNA code, but this experiment will focus on looking for the presence or absence of one Alu insertion in particular – specifically at the TPA 25 loci on chromosome 8 (address lingo for being around a gene called Tissue Plasminogen Activator). Furthermore, since humans received genetic instructions from both their mother and father, each individual will actually have two different chromosome 8’s to query. Therefore, possible genotypic outcomes may be +/+, -/-, or +/- for this Alu insertion.
It’s also very important to note that this Alu insertion in found within a junk region of the TPA 25 loci, so in effect represents junk DNA within junk DNA. Consequently, the results obtained will be phenotypically neutral, meaning that they do not mean anything and have no consequences (positive or negative) on your wellbeing. However, this experiment done on multiple family members can possibly result in paternity/maternity discrepancy, so it is advised not to perform this particular DNA fingerprint without first contemplating this issue.
Two primers, called the Alu Forward and the Alu Reverse, have been designed to flank the point of insertion where this Alu insertion may or may not exist. This means that they will be amplifying the region of DNA where your Alu insertion may exist. Consequently, data readout will be based on whether this amplified DNA has the extra 300 base pairs of your Alu insertion or not. Since the readout is dependant on observing a discrepancy in the size of the amplified product, you will visualize your data by doing a gel electrophoresis. The figure below summarizes this:
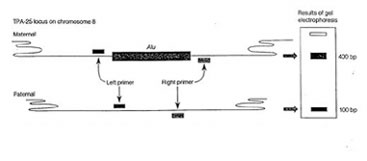
Figure Legend: The TPA 25 locus contains a dimorphism reflecting the presence or absence of a 300bp Alu sequence. When the Alu sequence is absent, amplification by PCR yields a 100bp product. If the Alu sequence is present, the size of the PCR product is increased to 400bp.
THE EXPERIMENTAL DETAILS
This is what you’ll need to start the experiment:
1. Your cheek cell DNA isolated as described in the print article. This involves obtaining a sample up to and including the step where you dissolve the snot pellet in 3 drops of running buffer overnight.
2. Two primers of the following sequence:
Alu Forward 5’-GTAAGAGTTCCGTAACAGGACAGCT-3’
Alu Reverse 5’-CCCCACCCTAGGAGAACTTCTCTTT-3’’
These can be ordered and shipped from a variety of oligonucleotide synthesis services (try typing that in google), which are fairly commonplace throughout the United States and Canada. Almost all vendors will accept credit card payment or invoice clients for a cheque. Here is a place in my neck of the woods that sells the primers for instance. Cost of both primers will run about $50, and likely good for well over 200 reactions.
3. A Heat Stable DNA Polymerase. This is where it can get confusing as well as needlessly expensive. There are many varieties of heat stable DNA polymerases out there, but some are quite sophisticated, capable of working better, working faster, working in odd conditions, etc. To add to the confusion, many polymerases will not come with all the reagents needed. These include the nucleotides, and often a MgCl2 solution (the polymerase needs Mg2+ to function properly). As well, most current enzymes are capable of something called a “hot start.” This is where, your enzyme is effectively turned off until the first high temperature step starts. This is an attempt to prevent non-specific amplification which likely starts the moment you begin you mix all together the various PCR reagents in your test tube.
In light of this complexity, we suggest using something like Invitrogen’s Platinum Blue PCR Supermix [2] (click on the reagent with the cat no 12580-015), because it is a solution that comes bundled with everything needed, except for the primers and the actual starting DNA sample. It even includes loading buffer in the reaction, so that it is ready for immediate loading onto the gel. Note that this reagent costs about $125 for 100 reactions, although you may be able to request for a smaller sample size if you can convince the vendor that this test run could lead to the purchase of more in the future (i.e. for high school programs, etc)
4. Plastic tubes: Essentially, you would want to obtain some sterile microcentrifuge tubes, or more specifically PCR tubes. Both are small plastic tubes that are generally designed to contain a maximum of either 1.7ml, 0.65ml or 0.2ml of fluid. PCR tubes are particular in that they have thinner walls so that more efficient heat transfer can occur during the cycling steps. The tubes available at Fisher Scientific would work well (a pack of 1000 tubes will run about $100). Note that ideally, the tubes you choose to purchase should physically match the hole sizes in the thermal cycler.
5. Mineral oil. When your reaction is heated at high temperatures on the thermal cycler, some of the fluid may evaporate and therefore significantly affect the PCR reaction. Consequently, an old trick would be to put some mineral oil into the reaction which results in a thin overlayer of oil that acts as a liquid lid. In addition, the mineral oil can be used to fill the tube holes in your thermal cycler heat block, to additionally ensure good heat transfer from the heat block to the reaction tube.
O.K. READY TO START THE PROCEDURE.
First up, you’ll need to prepare the stock solutions of the two primers, since they will most likely come lyophilized (dried down powder form). Prepare these primer stocks in distilled water to a final concentration of approximately mM.
Then set up your reaction in a PCR tube as follows (note that these figures are based on the use of the Blue Platinum Taq Polymerase Supermix).
45ul supermix
1ul Alu Forward primer
1ul Alu Reverse primer
5ul cheek cell DNA sample.
1 to 2 drops or ~20 to 40ul of mineral oil
Load into your thermal cycler, and start the PCR reaction according to the following conditions
i. 95C 180 sec (this is the hot start – may not be necessary)
ii. 95C 60sec (denaturation step)
iii. 58C 60sec (annealing of primers step)
iv. 72C 60sec (elongation step)
v. repeat step ii to iv (x 45) (45 cycles, enough for a theoretical 3.5 x 10¹³ fold increase)
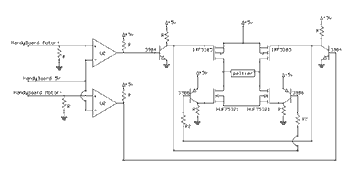
As the MAKE thermal cycler is controlled by a Handy Board, how this PCR schematic is achieved may take a bit of fiddling with the constraints of your apparatus. This will largely entail calculating the voltages required to reach your desired temperatures, which in turn are dependant on the heat transfer properties of the peltier device, heat block, heat sink, dimensions of the tube holes, the tube itself, etc. To help with this, below is a link to a template of the full code necessary as a starting point:
This reaction will likely take about 4 or so hours, dependant on the speed the thermal cycler is able to ramp up or ramp down to the next temperature step. However, once the reaction is completed, it is essentially ready to load onto your agarose gel (as described in the print article) except that since you are hoping to look at smallish DNA fragments (100bp and 400bp), you should use double the amount of Agar agar in your prep. As noted previously, because the Blue Platinum Supermix is premade with a loading buffer, you will not need to add the food coloring as a dye. Run the gel until the blue dye reaches approximately 2/3 of the length of the gel. At this point, we suggest staining with a more sensitive blue product (CarolinaBLU - $8) rather than the methylene blue aquarium product described in the print article, primarily due to the fact that DNA amounts are unlikely to be as impressive as the total cheek cell prep. It will also help to load a molecular weight standard so that driving the size of your observed bands is possible [3]. You will be looking for the occurence of either 100bp or 400bp bands, denoting the absence or presence of the Alu insertion as outlined previously.
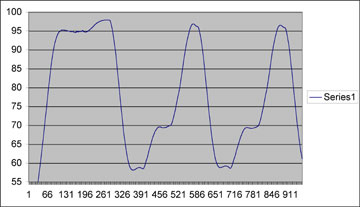
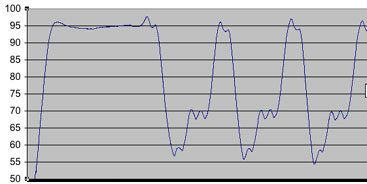
Temperature profile of the "hot start" and first two cycles of the thermal cycler run. Esentially looking good, with the only discrepancy from commercially bought PCR machines being a o.5oC/sec ramp speed (vs ~1oC/sec). We have been having a bit of trouble getting a nice looking gel, but are still working on it. New developments and data will be presented here.
SOME TIPS FOR TROUBLESHOOTING:
This experiment has actually been pretty well designed, and is well known for being fairly robust in delivering good results. However, our MacGyver technique is definitely not optimal. If results are not initially great here are a few things to try.
1. Use less of your cheek cell DNA sample. Because our method of DNA extraction likely yields a relatively impure sample, there is a chance that some impurity is having an adverse effect. Using less sample therefore, also effectively dilutes this problem. One can compensate for this by perhaps increasing the numbers of cycles.
2. On the other hand, your DNA sample can be too dilute. In which case, you may simply have a sensitivity issue in that the bands produced fall outside the detection range of our gel stain (even more so, since we are MacGyvering this aspect as well). Having too little DNA can also be detrimental, because it increases the likelihood of your primers interacting with each other, instead or your DNA sample. Using more sample can help offset this - perhaps use 10ul instead of the suggested 5ul, or simply incubate your initial snot pellet in less running buffer.
3. Playing with the annealing tempertures can also help. This is particularily so if the thermal cycler exhibits variations from the temperatures desired. Basically, you have to remember that the annealing temperature is a preferred kinetic parameter for the primers to bind specifically. In short, the 58C chosen is the optimal temperature for our primers to find their match in a specific manner. A temperature that is too hot, can lead to the primer falling off because under increased brownian motion, the primer doesn't get a chance to hold on. Likewise, a tempertaure that is too cold, can lead to primers binding in places where only a partial sequence match is found - this leads to non-specific amplication. Both can have major consequences on the success of your PCR.
Take the below schematic:
Here, you can see that the annealing temperture set at 58C, differentiates +/- ~3C. Under situations like this where the flunctuation is significant, it should be best to alter settings so that the upper end of the difference matches your prefered temperature. i.e set at 55-56C so that the upswing still doesn't go above the optimal temperature. We find this works best, to ensure that primer doesn't inadvertently "fall off" in this important step.
4. Similarily, playing with elongation temperatures can also help. Here the 72C is the preferred kinetic parameter for the polymerase to take hold and replicate. Too hot, and the polymerase is more likely to fall off. Too cold, and the polymerase may move slower. Consequently, we suggest (like with the annealing temperature), to use an elongation temperature such that the upper end of difference matches your prefered temperature. If you fear that this may slow down the polymerase significantly, then increase the elongation time. (so many variables to consider, but really that is the point, and why there is a caveat presented at the top).
FOOTNOTES
1. This experiment is based on a common high school experiment as detailed in “Laboratory 22: Detection of an Alu Insertion Polymorphism by Polymerase Chain Reaction” in Laboratory DNA Science, Mark V. Bloom, Greg A. Freyer, and David A. Micklos (1996) The Benjamin/Cummings Publishing Company, Inc.
2. There is a potentially free option for the heat stable DNA polymerase. There exists a pTaq e. coli bacteria, that contains the gene for the Taq Polymerase. This e.coli can therefore be grown up, and then boiled to lyse the cells. Since the only thing surviving this treatment is the Taq polymerase (everything else gets heat denatured), one has an extremely cost effective way of producing a heat stable DNA polymerase for educational use (see here for more information)
3. The ability to characterize your 100bp and/or 400bp fragments will also require loading a molecular weight standard in the gel. This is a commercially available sample of fragments of known size that can be used as a visual reference. I recommend using the 100 bp ladder available from New England Biolabs ( ~$60 for about 100 uses). This ladder is not needed if you happen to be +/- or have created or obtained a +/- sample (i.e. a sample with both bands, thaht can be used as your standard in subsequent experiments)
ETHICS: GENETIC TESTS AND TOYS
Genetics tests pose significant ethical questions, however the MacGyver DNA extractor is only a toy. While permitting real genetic experiments, these experiments are very crude compared to clinical genetic tests. Don’t eat the chemicals and mind the electric current but unless you try really hard, you are free of the burdens real genetic testers and takers face.
Genetic testing raises three noteworthy ethics issues:
1. Our MacGyver device might distinguish you from a banana. More accurate tests can unhinge your future or your family by revealing life-changing information.
2. Even accurate genetic tests produce only probabilistic information. Most of us don’t deal with probability terribly well – witness Los Vegas and “zero-tolerance” policing. With much at stake, we recommend you see consult a professional – physician or genetic counselor – on the advisability and interpretation of real genetic tests.
3. Accurate genetic information can be strategic: you can be harmed by others – employers, insurers -- discovering your results (risk status) or even knowing that you have had a genetic test. This is a further reason to consult a medical professional, whose ethics protects your privacy, and another reason to stress: our device is more a toy than a test.
These risks do not undercut the benefits of some real genetic tests. To explore the risks and benefits in a challenging historical case, try the interactive ethics survey at www.yourviews.ubc.ca. On the other hand, genetic tests are now available online, encouraging casual use. (See Wired 14.04 Scan My Guest List, Not My Genes for a quick cautionary account.) Williams-Jones’ Genetics & Ethics site is a good place to start further study.
(- Peter Danielson, Centre for Applied Ethics, Univ of B.C.)
| | | |
home (again)
about (us)
submit (or suggest)
notes (on masthead)
contributor (list)
archive (of stuff)


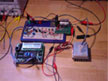
The MAKE Thermal Cycler uses the HandyBoard , a platform developed by Fred Martin at MIT which uses a Motorola 68HC11 controller. The board that has been used extensively at the University of British Columbia in Physics 253, a second-year Engineering Physics class for designing and building autonomous robots (see robot videos)
|